Assembling the hotend on your Tevo Tarantula is a crucial task for maintaining and upgrading your 3D printer’s performance. This guide provides a quick and easy-to-follow process for assembling your Tevo Tarantula hotend. Whether you’re replacing a worn-out component or upgrading to a new hotend, this guide ensures a smooth and successful assembly process. Following the steps, you’ll be back to printing in no time. Ensure you have all the necessary tools and materials before getting started, and always prioritize safety during the entire assembly process.
Tools and Materials You’ll Need
Before you begin, gathering the right tools and materials is essential for a successful Tevo Tarantula hotend assembly. Having everything ready will streamline the process and prevent any unexpected delays. Proper preparation not only saves time but also minimizes the risk of damaging components. This section lists the essential items you’ll need to complete the assembly, ensuring you’re well-equipped from the start.
Essential Tools
Several tools are vital for the Tevo Tarantula hotend assembly. These tools will help you disassemble the old hotend, assemble the new one, and make any necessary adjustments. Some of these tools are common household items. These tools will make the process easier and more efficient, preventing damage to the hotend during assembly. Having the right tools ensures a cleaner, more accurate assembly process.
- Screwdrivers (various sizes, Phillips head)
- Wrench set (metric)
- Needle-nose pliers
- Hex key set (metric)
- Wire cutters/strippers
- Multimeter (for testing)
Recommended Materials

In addition to the tools, certain materials are recommended for the Tevo Tarantula hotend assembly. These items ensure the optimal performance and longevity of your hotend. From thermal paste to replacement parts, having these materials on hand will help you build the hotend. These materials will make your assembly process more effective.
- New hotend assembly kit (if replacing)
- Thermal paste
- Replacement nozzle (optional)
- Electrical tape
- Heat-resistant tape (Kapton or similar)
Disassembling the Old Hotend
Before assembling your new hotend, you’ll need to disassemble the old one. This crucial step involves carefully removing the existing components. Take care to disconnect wires and remove screws. Proper disassembly ensures a clean start for your new hotend. This step is necessary to get the printer ready to work with the new parts.
Removing the Old Hotend
Begin by disconnecting all wires connected to the hotend. This includes the heater cartridge wires and the thermistor wires. Use a screwdriver or wrench to remove any screws or bolts securing the hotend to the printer’s carriage. Carefully detach the hotend from the carriage, taking note of the orientation and any other connected parts. Set the removed hotend aside to clean the components before putting the new one in place.
Cleaning the Components

After removing the old hotend, inspect all components for any signs of wear or damage. Clean the heat sink, heat block, and any other reusable parts. Use a wire brush or small tool to remove any filament residue from the heat block and nozzle. If you are reusing the thermistor and heater cartridge, clean their contacts. This ensures good thermal contact and a secure fit. A clean workspace will make your new hotend work better.
Assembling the New Hotend
With the old hotend disassembled and the components cleaned, you’re now ready to assemble the new hotend. Take your time with each step. Ensure all components fit correctly, and no parts are damaged. This stage is the cornerstone of a functional 3D printer. This section guides you through each step, ensuring a properly assembled and effective hotend. Taking your time will help make the 3D printer work as expected.
Attaching the Heater Cartridge
Insert the heater cartridge into the designated hole in the heat block. Ensure it fits snugly and securely. If necessary, apply a small amount of thermal paste to the cartridge to improve heat transfer. Use the screws provided in the kit to secure the heater cartridge to the heat block. Be careful not to overtighten the screws, as this could damage the cartridge or the heat block. Double-check that the heater cartridge is firmly in place.
Installing the Thermistor
Insert the thermistor into its designated hole in the heat block. Make sure the thermistor is inserted all the way. Secure the thermistor with a small screw or clamp, ensuring it makes good contact with the heat block. Proper contact is critical for accurate temperature readings. Check the wiring of the thermistor so that it is positioned correctly. This step is crucial for precise temperature control, ensuring that the print bed and nozzle temperature matches the printer’s setting.
Securing the Heat Break
Screw the heat break into the heat block. Ensure the heat break is properly tightened to prevent filament leakage. Make sure the heat break is flush with the heat block. Use a wrench to tighten the heat break. The heat break prevents heat from traveling up to the cold end of the hotend, which could cause filament jams. Proper tightening ensures that the heat break is securely in place.
Connecting the Nozzle
Screw the nozzle into the heat block. Ensure the nozzle is properly tightened. It is essential to heat the heat block to the recommended temperature for your nozzle before tightening it. Use a wrench to tighten the nozzle. Make sure the nozzle is seated correctly against the heat break to prevent filament leaks. This will prevent the filament from leaking when the printer is working, making it work as intended.
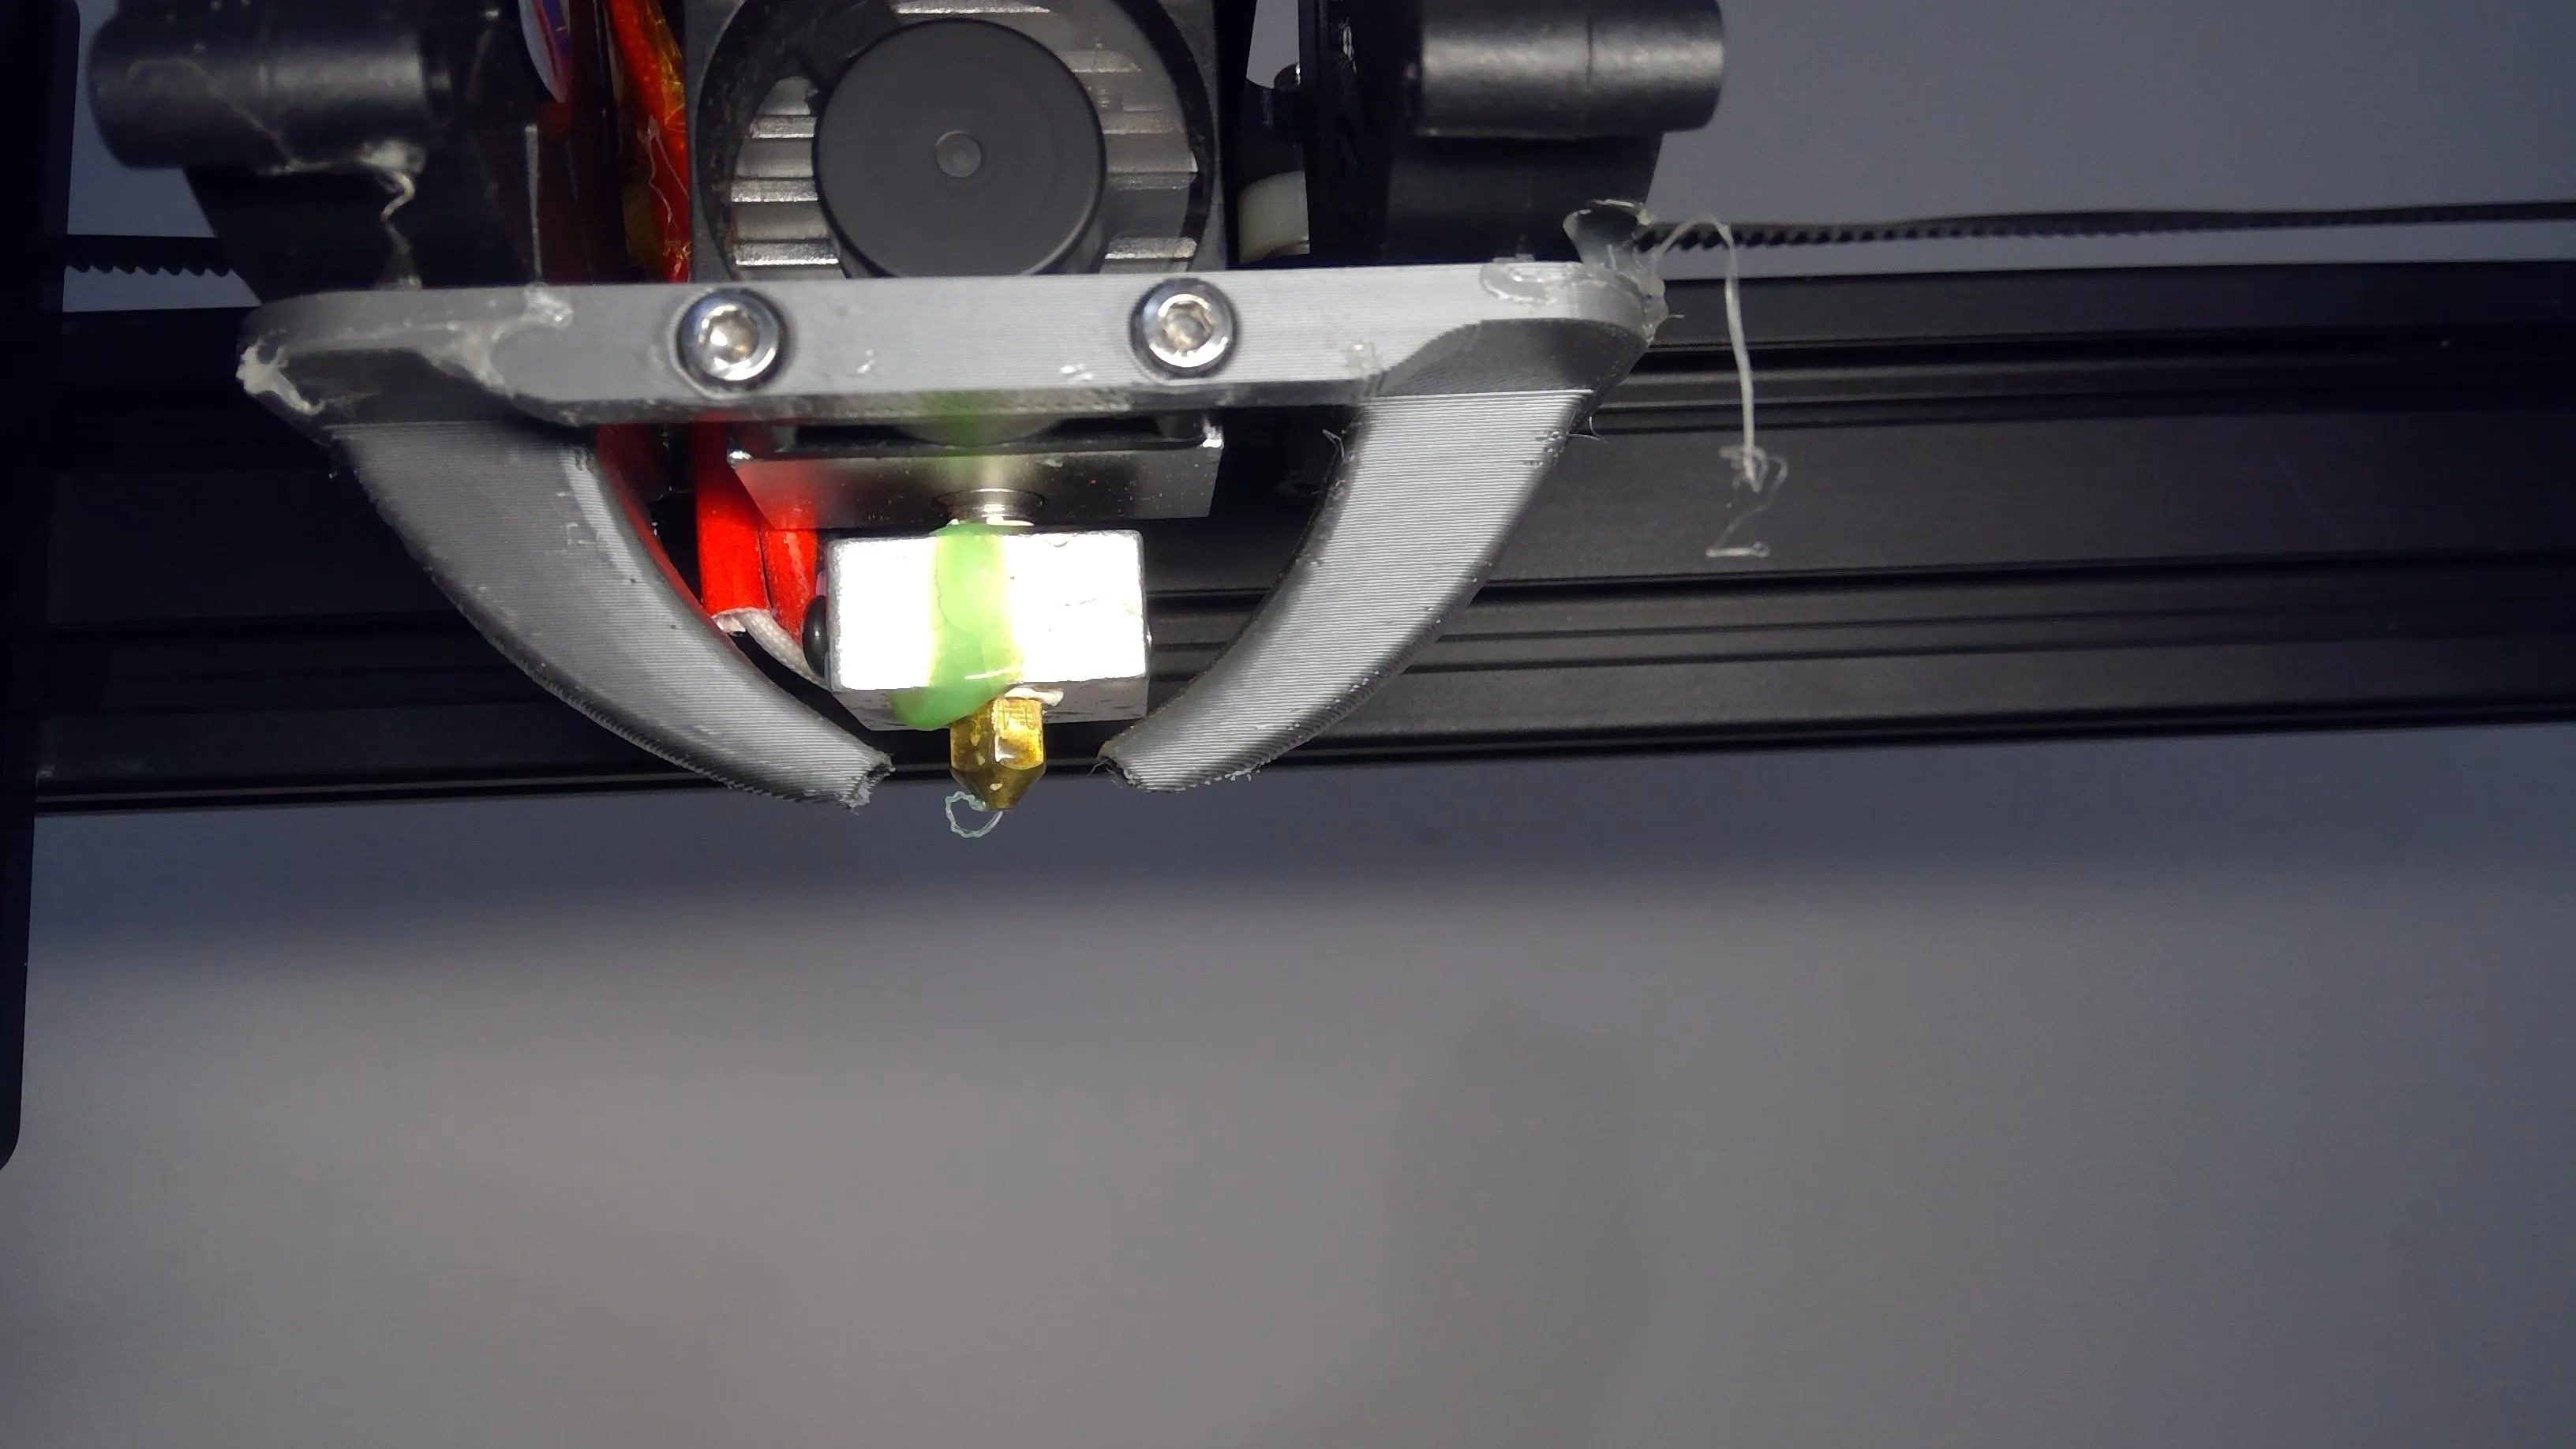
Mounting the Hotend on the Printer

Once you’ve assembled the hotend, it’s time to mount it on the Tevo Tarantula. This step involves carefully attaching the hotend to the printer’s carriage, ensuring it is secure and correctly aligned. Proper mounting is crucial for accurate and reliable 3D printing. This section guides you through the process, ensuring a secure and well-aligned hotend. Take your time and make sure that everything is aligned correctly.
Aligning and Securing
Carefully align the assembled hotend with the printer’s carriage. Use screws to secure the hotend to the carriage, ensuring it is firmly in place. Double-check the alignment. The nozzle must be positioned correctly in relation to the print bed. Ensure the hotend is not tilted or angled. Make sure everything is aligned correctly and that the screws are tight, but not too tight. This step ensures the hotend is stable and ready to print.
Wiring and Connection
Reconnect the heater cartridge wires and the thermistor wires. Ensure the connections are secure and correctly oriented. Use electrical tape to secure the wires. Route the wires neatly to prevent them from interfering with the printer’s movement. Make sure that the wires do not come into contact with any moving parts. Proper wiring is essential for the hotend to function correctly. This step will prevent electrical issues and maintain safety while the printer is working.
Testing and Calibration

After assembling and mounting your new hotend, the final step is to test and calibrate it. This crucial step ensures that the hotend functions correctly and produces high-quality prints. Testing involves checking for proper heating, verifying the absence of leaks, and calibrating the Z-offset. This section guides you through each step, helping you confirm that the hotend is functioning at its best.
Heating Up the Hotend
Turn on your 3D printer and preheat the hotend to the printing temperature for your chosen filament. Monitor the temperature readings on the printer’s display. Ensure the hotend reaches the desired temperature and maintains it consistently. If the temperature doesn’t rise, check the connections to the heater cartridge. This step verifies that the heater cartridge is functioning correctly and that the hotend can reach and maintain the correct printing temperature.
Checking for Leaks
Heat the hotend to printing temperature and allow it to sit for a few minutes. Inspect the heat block and nozzle for any signs of filament leakage. If you notice filament oozing out, carefully tighten the nozzle and heat break. Check the fittings and connections to the heat block and nozzle for any signs of leakage. If the filament leaks, it could affect the quality of the print.
Calibrating the Z-Offset

Calibrate the Z-offset to ensure the nozzle is the correct distance from the print bed. The Z-offset is the distance between the nozzle and the bed. Adjust the Z-offset using the printer’s control panel or slicer software until the first layer of your print adheres properly to the bed. If the nozzle is too far from the bed, the filament won’t stick. If the nozzle is too close, it may scrape the bed. Proper Z-offset calibration is crucial for achieving good first-layer adhesion and successful prints.
Troubleshooting Common Issues
Even with careful assembly, you might encounter some common issues. Troubleshooting these problems will help you understand the issues and solve the issues that will occur. Addressing these problems quickly can ensure you get back to printing. This section provides solutions for issues that you may encounter during the process.
- Filament not extruding Check for clogs in the nozzle or heat break. Ensure the extruder motor is functioning correctly. Verify the hotend temperature is correct.
- Filament leaks Tighten all fittings and connections. Ensure the nozzle is seated correctly.
- Temperature fluctuations Check the thermistor connections. Make sure the thermistor is securely seated.
- Poor first-layer adhesion Recalibrate the Z-offset. Level the print bed properly.
- Hotend not heating Check the heater cartridge connections. Verify the power supply is working.
By following this quick guide, you should be able to assemble the hotend on your Tevo Tarantula. You can quickly upgrade or replace the hotend on your printer with the knowledge of how to assemble it. Make sure you use all the tools and materials, and follow each step carefully to ensure everything works the way it is supposed to. You can avoid common issues and get back to printing with minimal downtime.